Approximate Finished Size:
From Head to Foot…12”
From Hand to Hand…15.5”
Fabric and Notion Requirements:
Body: polar fleece 15” X 55"
Felt: small pieces of purple (hair), orange (spots) and white (eyeball)
Thread: dark brown
Batting: polyester Fiberfil
Few Sheets of Paper
Floss: dark brown
Fabric Glue
**Note – There are many ways to make Woogie. I tried several of them. I have included the way that was quickest and easiest for me.
- Print the download.
- Tape together all the pieces that make up the front(4pages), the left side(3pages) and the right side(3pages) of Woogie.
- Cut out the 3 sections on the cutting line. (the dotted line)
- Pin the 3 sections onto the fabric, using lots and lots of pins! Cut out the 3 sections.
Because polar fleece has a nap, be careful to have every pattern piece headed the same direction. Example: when you lay out your fabric, have the head of every piece either up or down. This will ensure that the shine of the fabric looks the same over the entire monster.
- Remove the pins and pattern pieces from each section.
- Cut out all the spots from each section.
- Use these as patterns


 to cut the orange felt spots that go on Woogie’s body. Put a little glue behind each spot and
glue it onto the appropriate body section matching placement with the pattern.
- Using the dark brown thread, buttonhole stitch around each spot, using either your sewing machine or by hand.
- If you are using your machine, place a piece of paper under all layers of fabric before you begin stitching (which would be on top of the feed dogs on your machine.) The paper will stabilize the fabric and keep it from stretching as you sew. When you are done with each spot, remove the paper. This will be quite easy. The needle will have perforated the paper for you. To remove the paper inside the spot, poke the sharp end of your scissors inside the spot and make a little notch. Be careful not to clip the fabric. Tear the paper to the edge of the stitching. Hold the stitching down with the index finger and thumb of one hand, tear the paper around the stitching with the other hand. You need to hold onto the stitching so it won’t tear through or stretch. Don’t worry about little snippets of paper that are left in the stitching.
- Cut the eyeball shape from the pattern. Use this pattern to cut a white felt eyeball. Using the dark brown floss, all 6 strands, satin stitch the pupil onto the eyeball, following the pattern.
- Glue the eyeball onto the body front matching placement according to the pattern, leaving a small opening. Stuff a small amount of batting underneath the eyeball, then finish gluing it down.
- Buttonhole stitch around the eyeball.
- Stitch the mouth and belly button on. Mark the line for the mouth and belly button on your fabric with a pencil. Set your machine for a tight zig-zag stitch. Using the dark brown thread and placing paper underneath the fabric, stitch the mouth and belly button on. Remove the paper.
- Stitch the 2 back sections together. With right sides together and using a lot of pins, begin stitching at point “A”, stitching down about 2”. Backstitch.
- Leave a 3” opening and begin stitching again, stitching down the remainder of back, around the tail, and to point “B”. Backstitch.
- Cut the hair from the purple felt. Pin the hair onto the right side of the front facing down to the feet. The raw edge of Woogie’s head and the bottom of the hair should be lined up. Stay-stitch th


 e hair onto the front section of Woogie.
- Stitch the front and back together. With right sides together and using a lot of pins, begin stitching at point ”B”, around the entire body until you come to “B” again. Backstitch at both points. Be careful not to catch the tail!
- Clip all curves so they will lay flat when stuffed.
- Turn Woogie inside out, using the blunt end of a pencil eraser etc to push out the tail end, toes and fingers.
- Through the opening on the back stuff Woogie with Fiberfil.
- When you are satisfied with the amount of stuffing, slip stitch the opening closed.
- If there is a slight hole at the base of the tail, slip stitch is closed also.
- DONE! Give Woogie to your favorite kid!
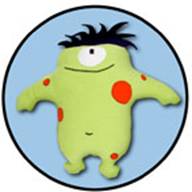
Sample made from Lime Green Polar Fleece, distributed by Westminster Fibers.
Woogie Pattern- By Scott Jarrard
Written Instructions- By Karen Bennett of Nellies Needle Quilt Patterns
Boogie Monster fabric available through: www.FreeSpiritFabric.com
For more Boogie Monster sewing patterns please visit: www.SCOTTJARRARD.com
“Woogie” sewing pattern was designed by Scott Jarrard. MAY BE COPIED or REPRODUCED for PERSONAL USE ONLY - THANK YOU! “Woogie” Characters and logos used in “Woogie” Pattern, © 2009 Scott Jarrard Illustration inc.


 to cut the orange felt spots that go on Woogie’s body. Put a little glue behind each spot and

 e hair onto the front section of Woogie.